To install and setup your AirPort Express Base Station to create a new wireless network follow these steps:
Step One
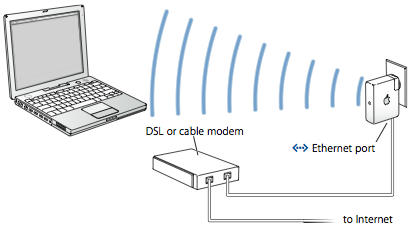
First lets unpackage the AirPort Express and hook it up. Plug your modem into the Ethernet port on the AirPort Express. Now plug the AirPort Express into a power outlet.


Step Two
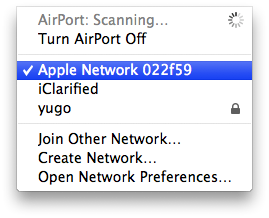
Give the Base Station a few minutes to boot. Then click the AirPort icon at the top right hand corner of the screen. Select the Apple Network from the dropdown.


Step Three
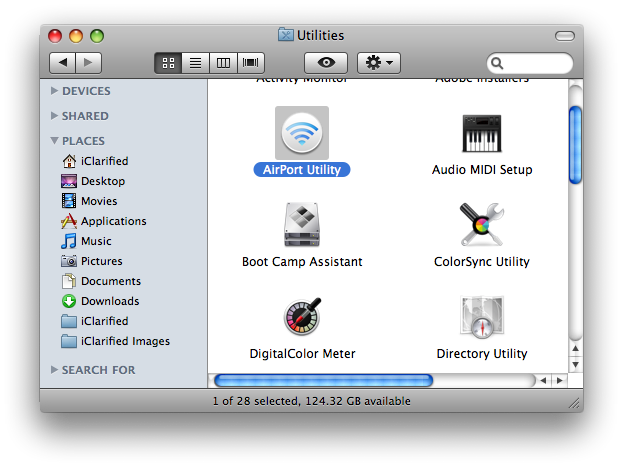
Open a new Finder window and run AirPort Utility from within Applications : Utilities.


If you do not have AirPort Utility you will have to install it from the CD that came with your AirPort Express. Insert the CD and a window will popup showing the contents of the disc. Double click the AirPort Express package icon begin the installation. Once installation is complete open a new Finder window and run AirPort Utility from within Applications : Utilities.
Step Four
Airport Utility will search and find the connected Airport Express. Click the Continue button to set up your base station.
Step Five
To personalize your AirPort Express name your Base Station and give it a password. Then click the Continue button to continue setup.
Step Six
Now you must choose the type of setup for this AirPort Express. Select the option I don't have a wireless network and I want to create one. Then click the Continue button.
Step Seven
Enter the name for your new Wireless Network. Then select the security for your network. WPA/WPA2 Personal is the most secure. Then enter a username and password for your wireless network. If you do not wish to password protect your wireless network then select No Security. Click the Continue button.
Step Eight
Select how you connect to the Internet. If you use DSL and need to enter a username and password then select I use a DSL or cable modem using PPP over Ethernet (PPPoE). If you don't want to connect to the internet then select I am not ready to connect to the Internet right now. Click the Continue to continue setup.
Step Nine
Enter your connection information. Set your Account Name, Password, and Service Name. Usually you would have your Connection set to Always On. Click the Continue button to continue setup.
Step Ten
AirPort Utility will show you a window summarizing your setup. Click the Go Back button to go back and change something. If you are happy with the settings click the Update button.
A popup will appear asking you confirm that its okay for AirPort Express to be temporarily unavailable. Click the Continue button.
Step Eleven
Wait for the AirPort Express to restart and update your settings.
Step Twelve
Once the AirPort Express has rebooted it will have a different network name. Select this network from the AirPort menu at the top right of your screen.
Notice that the AirPort utility will have updated with your new Base Station name and a green light!
Step One
First lets unpackage the AirPort Express and hook it up. Plug your modem into the Ethernet port on the AirPort Express. Now plug the AirPort Express into a power outlet.


Step Two
Give the Base Station a few minutes to boot. Then click the AirPort icon at the top right hand corner of the screen. Select the Apple Network from the dropdown.


Step Three
Open a new Finder window and run AirPort Utility from within Applications : Utilities.


If you do not have AirPort Utility you will have to install it from the CD that came with your AirPort Express. Insert the CD and a window will popup showing the contents of the disc. Double click the AirPort Express package icon begin the installation. Once installation is complete open a new Finder window and run AirPort Utility from within Applications : Utilities.
Step Four
Airport Utility will search and find the connected Airport Express. Click the Continue button to set up your base station.
Step Five
To personalize your AirPort Express name your Base Station and give it a password. Then click the Continue button to continue setup.
Step Six
Now you must choose the type of setup for this AirPort Express. Select the option I don't have a wireless network and I want to create one. Then click the Continue button.
Step Seven
Enter the name for your new Wireless Network. Then select the security for your network. WPA/WPA2 Personal is the most secure. Then enter a username and password for your wireless network. If you do not wish to password protect your wireless network then select No Security. Click the Continue button.
Step Eight
Select how you connect to the Internet. If you use DSL and need to enter a username and password then select I use a DSL or cable modem using PPP over Ethernet (PPPoE). If you don't want to connect to the internet then select I am not ready to connect to the Internet right now. Click the Continue to continue setup.
Step Nine
Enter your connection information. Set your Account Name, Password, and Service Name. Usually you would have your Connection set to Always On. Click the Continue button to continue setup.
Step Ten
AirPort Utility will show you a window summarizing your setup. Click the Go Back button to go back and change something. If you are happy with the settings click the Update button.
A popup will appear asking you confirm that its okay for AirPort Express to be temporarily unavailable. Click the Continue button.
Step Eleven
Wait for the AirPort Express to restart and update your settings.
Step Twelve
Once the AirPort Express has rebooted it will have a different network name. Select this network from the AirPort menu at the top right of your screen.
Notice that the AirPort utility will have updated with your new Base Station name and a green light!

