These are instructions on how to install Homebrew on your Mac.
Homebrew is a package manager that "installs the stuff you need that Apple (or your Linux system) didn't." It's a very useful collection of software packages, developer tools, and command line tools like node, git, wget, yarn, ffmpeg, youtube-dl, etc.
Launch the Terminal app from Applications > Utilities.

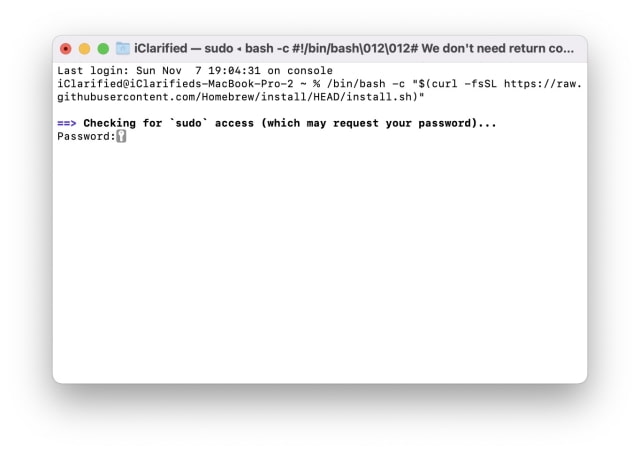
Enter the following command into the Terminal window to launch the Homebrew installation script.
/bin/bash -c "$(curl -fsSL https://raw.githubusercontent.com/Homebrew/install/HEAD/install.sh)"


Input your administrative user password when prompted.


If you haven't already installed Xcode, Homebrew may prompt you to install Xcode Command Line Tools. You will need to do this to get Homebrew installed. Press the Return key to continue.
The Homebrew installation process will now begin. This could take a few minutes.
Homebrew will show you the two commands that need to be run to add the package manager to your path.
Execute these commands in the Terminal window.
Congratulations, you've finished installing Homebrew! You can now search for Homebrew packages and install command line tools.
Search for package using "brew search [term]". For example, you can locate sql and related command line tools by typing "brew search sql" into your Terminal window.
You can install a package using "brew install [packagename]". For example, enter "brew install postgresql" to install the open source PostgreSQL database.
To keep Homebrew updated, run "brew update" periodically in Terminal.
To uninstall homebrew, you can use the following command in Terminal.
/bin/bash -c "$(curl -fsSL https://raw.githubusercontent.com/Homebrew/install/HEAD/uninstall.sh)"
● formula: Homebrew package definition built from upstream sources
● cask: Homebrew package definition that installs macOS native applications
● keg: installation destination directory of a given formula version e.g. /usr/local/Cellar/foo/0.1
● rack: directory containing one or more versioned kegs e.g. /usr/local/Cellar/foo
● keg-only: a formula is keg-only if it is not symlinked into Homebrew’s prefix (e.g. /usr/local)
● cellar: directory containing one or more named racks e.g. /usr/local/Cellar
● Caskroom: directory containing one or more named casks e.g. /usr/local/Caskroom
● external command: brew subcommand defined outside of the Homebrew/brew GitHub repository
● tap: directory (and usually Git repository) of formulae, casks and/or external commands
● bottle: pre-built keg poured into the cellar/rack instead of building from upstream sources
Homebrew is a package manager that "installs the stuff you need that Apple (or your Linux system) didn't." It's a very useful collection of software packages, developer tools, and command line tools like node, git, wget, yarn, ffmpeg, youtube-dl, etc.
Install Homebrew on Mac
Step One
Launch the Terminal app from Applications > Utilities.


Step Two
Enter the following command into the Terminal window to launch the Homebrew installation script.
/bin/bash -c "$(curl -fsSL https://raw.githubusercontent.com/Homebrew/install/HEAD/install.sh)"


Step Three
Input your administrative user password when prompted.


Step Four
If you haven't already installed Xcode, Homebrew may prompt you to install Xcode Command Line Tools. You will need to do this to get Homebrew installed. Press the Return key to continue.
Step Five
The Homebrew installation process will now begin. This could take a few minutes.
Step Six
Homebrew will show you the two commands that need to be run to add the package manager to your path.
Execute these commands in the Terminal window.
Step Six
Congratulations, you've finished installing Homebrew! You can now search for Homebrew packages and install command line tools.
Search for package using "brew search [term]". For example, you can locate sql and related command line tools by typing "brew search sql" into your Terminal window.
You can install a package using "brew install [packagename]". For example, enter "brew install postgresql" to install the open source PostgreSQL database.
To keep Homebrew updated, run "brew update" periodically in Terminal.
Uninstall Homebrew
To uninstall homebrew, you can use the following command in Terminal.
/bin/bash -c "$(curl -fsSL https://raw.githubusercontent.com/Homebrew/install/HEAD/uninstall.sh)"
Homebrew Terminology
● formula: Homebrew package definition built from upstream sources
● cask: Homebrew package definition that installs macOS native applications
● keg: installation destination directory of a given formula version e.g. /usr/local/Cellar/foo/0.1
● rack: directory containing one or more versioned kegs e.g. /usr/local/Cellar/foo
● keg-only: a formula is keg-only if it is not symlinked into Homebrew’s prefix (e.g. /usr/local)
● cellar: directory containing one or more named racks e.g. /usr/local/Cellar
● Caskroom: directory containing one or more named casks e.g. /usr/local/Caskroom
● external command: brew subcommand defined outside of the Homebrew/brew GitHub repository
● tap: directory (and usually Git repository) of formulae, casks and/or external commands
● bottle: pre-built keg poured into the cellar/rack instead of building from upstream sources

