Instructions on how to unlock your 1.1.2 OTB and 1.1.3 OTB iPhone!
These instructions assume that you have already jailbroken the particular firmware you would like to be on. This works from 1.1.2 or 1.1.3 firmware! You can find instructions on how to do that here:
Jailbreak 1.1.2: Windows, Mac
Jailbreak 1.1.3: Installer, Windows, Mac
Downgrade 1.1.3: Windows, Mac
Also, you can only follow these instructions if you are on a 4.6 BL iPhone. This means that your iPhone came with 1.1.2 or 1.1.3 Out of the Box. PLEASE MAKE SURE YOU DON'T DO THIS ON A 3.9 BL IPHONE!
IMPORTANT*: You must have enough disk space free on your iPhone to install this package. Otherwise Installer may display a beach ball and then crash to the Springboard. You need space free on your ROOT file system. Your root file system is about 267M-300M in size. Its NOT the 7.3G file system! A tutorial on how to do this can be found here
Finally, you need BSD Subsystem Installed from Installer app (System Category). This most likely will already be installed especially if you did the 1.1.3 soft update...
If you have 1.1.3 OTB follow the downgrade link above to downgrade and jailbreak your iPhone.
Step One
Add iClarified to your Installer sources. You can find instructions on how to do that: here
Step Two
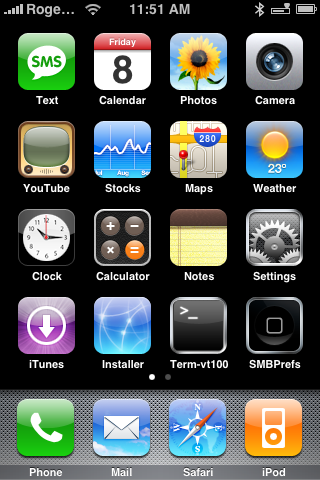
Press the Settings icon on your Springboard.


Step Three
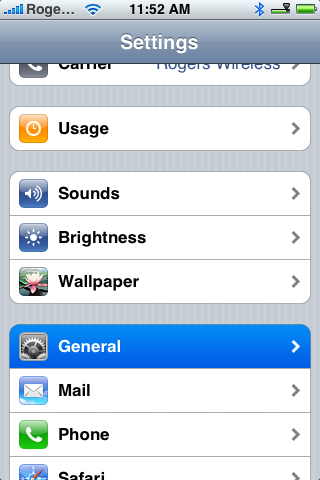
Press to select General from the Settings list.


Step Four
Press to select Auto-Lock from the General Menu.
Step Five
Press to select Never from the Auto-Lock Menu.
Step Six
Press the Home button to return to your Springboard. Press the Installer icon to launch Installer app.
Step Seven
Press to select the Install tab at the bottom of the screen.
Step Eight
Press to select iClarified from the list of Categories.
Step Nine
Press to select Geohot Unlock(1.1.2, 1.1.3) from the list of Packages.
Step Ten
Press the Install button at the top right hand corner.
Step Eleven
Press the large red Install button that appears.
Step Twelve
You will receive notice that process will take 5 minutes and you must have Auto-Lock set to Never. If you have already done this then you can press the large OK button.
Step Thirteen
You will see a status of Starting the unlock.... You will also lose Wi-Fi during this time. The phone will stay on this status for a few minutes.
Step Fourteen
You will then receive a Notice saying "Your iPhone has now been unlocked!". Press the large OK button!
Step Fifteen
You will be returned to the Categories Menu. Press the Home button to return to your Springboard.
You are done! Unlocked iPhone :) Huge thanks go to Geohot for developing this. He truely is a genius. You can donate to him: here.
NOTES**: I personally tested this on my 1.1.2 OTB iPhone which was DEV updated to 1.1.3! Also it has been tested on 1.1.3 OTB by Viper! (Thanks!).
Also, if you are having a problem with your dialer crashing after this tutorial, it is likely that you are in an unsupported country. Either install iWorld from Installer or preferably add your country to AppSupport. You can do this by following this tutorial: How to Add an Unsupported Country to App Support
These instructions assume that you have already jailbroken the particular firmware you would like to be on. This works from 1.1.2 or 1.1.3 firmware! You can find instructions on how to do that here:
Jailbreak 1.1.2: Windows, Mac
Jailbreak 1.1.3: Installer, Windows, Mac
Downgrade 1.1.3: Windows, Mac
Also, you can only follow these instructions if you are on a 4.6 BL iPhone. This means that your iPhone came with 1.1.2 or 1.1.3 Out of the Box. PLEASE MAKE SURE YOU DON'T DO THIS ON A 3.9 BL IPHONE!
IMPORTANT*: You must have enough disk space free on your iPhone to install this package. Otherwise Installer may display a beach ball and then crash to the Springboard. You need space free on your ROOT file system. Your root file system is about 267M-300M in size. Its NOT the 7.3G file system! A tutorial on how to do this can be found here
Finally, you need BSD Subsystem Installed from Installer app (System Category). This most likely will already be installed especially if you did the 1.1.3 soft update...
If you have 1.1.3 OTB follow the downgrade link above to downgrade and jailbreak your iPhone.
Step One
Add iClarified to your Installer sources. You can find instructions on how to do that: here
Step Two
Press the Settings icon on your Springboard.


Step Three
Press to select General from the Settings list.


Step Four
Press to select Auto-Lock from the General Menu.
Step Five
Press to select Never from the Auto-Lock Menu.
Step Six
Press the Home button to return to your Springboard. Press the Installer icon to launch Installer app.
Step Seven
Press to select the Install tab at the bottom of the screen.
Step Eight
Press to select iClarified from the list of Categories.
Step Nine
Press to select Geohot Unlock(1.1.2, 1.1.3) from the list of Packages.
Step Ten
Press the Install button at the top right hand corner.
Step Eleven
Press the large red Install button that appears.
Step Twelve
You will receive notice that process will take 5 minutes and you must have Auto-Lock set to Never. If you have already done this then you can press the large OK button.
Step Thirteen
You will see a status of Starting the unlock.... You will also lose Wi-Fi during this time. The phone will stay on this status for a few minutes.
Step Fourteen
You will then receive a Notice saying "Your iPhone has now been unlocked!". Press the large OK button!
Step Fifteen
You will be returned to the Categories Menu. Press the Home button to return to your Springboard.
You are done! Unlocked iPhone :) Huge thanks go to Geohot for developing this. He truely is a genius. You can donate to him: here.
NOTES**: I personally tested this on my 1.1.2 OTB iPhone which was DEV updated to 1.1.3! Also it has been tested on 1.1.3 OTB by Viper! (Thanks!).
Also, if you are having a problem with your dialer crashing after this tutorial, it is likely that you are in an unsupported country. Either install iWorld from Installer or preferably add your country to AppSupport. You can do this by following this tutorial: How to Add an Unsupported Country to App Support
