These are instructions on how to unlock your 3.9 Bootloader iPhone with AnySIM 1.3 for use on the 1.1.3 firmware!
To follow these directions you must have a 3.9 Bootloader iPhone. This means that your iPhone came with firmware 1.1.1 or lower out of the box. The instructions also assume that you already have soft updated to 1.1.3.
Step One
First we must update our baseband to 04.03.13_G. To do this you must follow this tutorial:
How to Upgrade the Baseband of Your 3.9 BL iPhone to 0403313g
Step Two
Now that we are at 1.1.3, jailbroken, and with the right baseband we can begin to unlock!
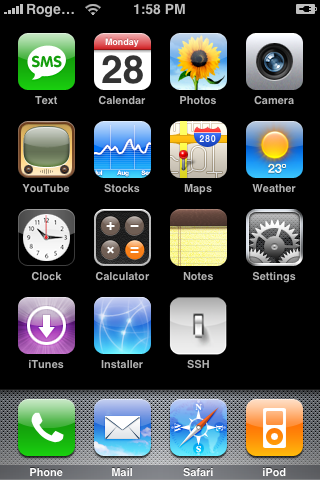
Press to select Settings from the Springboard.


Step Three
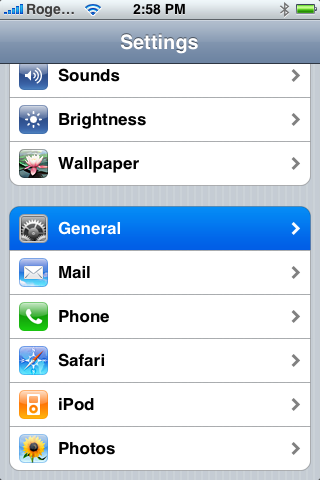
Press to select General from the list of Settings.


Step Four
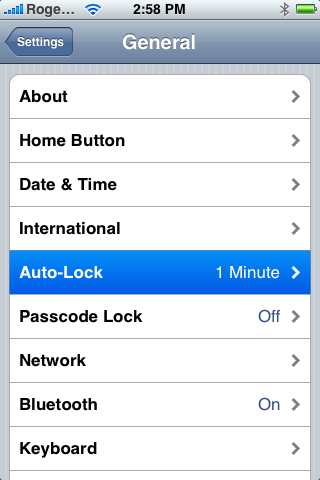
Press to select Auto-Lock from the General Menu.


Step Five
Press to select Never from the Auto-Lock Menu.
Step Six
Press the Home button to return to your Springboard then press the Installer icon to launch it.
Step Seven
Press the Install tab at the bottom of the screen.
Step Eight
Press to select iClarified from the list of Categories.
If you haven't already added the iClarified installer source you must do this to see the iClarified category! You can find instructions to do this here:
How to Add the iClarified Source to Installer
Step Nine
Press to select anySIM 1.3 from the list of Packages.
Step Ten
Press the Install button at the top right of the screen.
Step Eleven
Press the large red Install button that appears.
Step Twelve
The anySIM 1.3 will install and then you will be returned to the Categories list. Press the Home button to return to your Springboard.
Step Thirteen
Notice the new anySIM icon on your Springboard. Before we can unlock we must enable Airplane mode. Press to select Settings from your Springboard.
Step Fourteen
Slide the Airplane Mode switch to the ON position.
Step Fifteen
Press the Home button to return back to your Springboard. Press the anySIM icon located on your Springboard.
Step Sixteen
Press the large OK button to continue past the welcome message.
Step Seventeen
Slide the Unlock Slider to the right to begin your unlock procedure.
Step Eighteen
Scroll down and read the legal information then click the large red OK, Unlock My Phone button.
NOTES***: If you are experiencing a problem with AnySIM telling you that your Auto-Lock is not set to never you can try this solution posted by iderzh. Thanks!
It is very simple solution, the root cause is: anySIM 1.3 checks in /var/root/Library/Preferences/com.apple.springboard.plist file "SBAutoLockTime" value. So, if you used Official Dev Team 1.1.3 Upgrade this file was moved to /var/mobile/Library/Preferences/ .
Solution only for iPhone with 1.1.3 (Official Dev Team Release):
1. Set "Auto-Lock" to "Never"
2. Rename /var/root/Library/Preferences/com.apple.springboard.plist to /var/root/Library/Preferences/com.apple.springboard.plist.old
3. Copy /var/mobile/Library/Preferences/com.apple.springboard.plist to /var/root/Library/Preferences/com.apple.springboard.plist
4. Set "Airplane mode" to ON.
5. run anySIM 1.3 (now it should run smoothly)
6. rename /var/root/Library/Preferences/com.apple.springboard.plist.old to /var/root/Library/Preferences/com.apple.springboard.plist
7. turn "Airplane mode" OFF
To follow these directions you must have a 3.9 Bootloader iPhone. This means that your iPhone came with firmware 1.1.1 or lower out of the box. The instructions also assume that you already have soft updated to 1.1.3.
Step One
First we must update our baseband to 04.03.13_G. To do this you must follow this tutorial:
How to Upgrade the Baseband of Your 3.9 BL iPhone to 0403313g
Step Two
Now that we are at 1.1.3, jailbroken, and with the right baseband we can begin to unlock!
Press to select Settings from the Springboard.


Step Three
Press to select General from the list of Settings.


Step Four
Press to select Auto-Lock from the General Menu.


Step Five
Press to select Never from the Auto-Lock Menu.
Step Six
Press the Home button to return to your Springboard then press the Installer icon to launch it.
Step Seven
Press the Install tab at the bottom of the screen.
Step Eight
Press to select iClarified from the list of Categories.
If you haven't already added the iClarified installer source you must do this to see the iClarified category! You can find instructions to do this here:
How to Add the iClarified Source to Installer
Step Nine
Press to select anySIM 1.3 from the list of Packages.
Step Ten
Press the Install button at the top right of the screen.
Step Eleven
Press the large red Install button that appears.
Step Twelve
The anySIM 1.3 will install and then you will be returned to the Categories list. Press the Home button to return to your Springboard.
Step Thirteen
Notice the new anySIM icon on your Springboard. Before we can unlock we must enable Airplane mode. Press to select Settings from your Springboard.
Step Fourteen
Slide the Airplane Mode switch to the ON position.
Step Fifteen
Press the Home button to return back to your Springboard. Press the anySIM icon located on your Springboard.
Step Sixteen
Press the large OK button to continue past the welcome message.
Step Seventeen
Slide the Unlock Slider to the right to begin your unlock procedure.
Step Eighteen
Scroll down and read the legal information then click the large red OK, Unlock My Phone button.
NOTES***: If you are experiencing a problem with AnySIM telling you that your Auto-Lock is not set to never you can try this solution posted by iderzh. Thanks!
It is very simple solution, the root cause is: anySIM 1.3 checks in /var/root/Library/Preferences/com.apple.springboard.plist file "SBAutoLockTime" value. So, if you used Official Dev Team 1.1.3 Upgrade this file was moved to /var/mobile/Library/Preferences/ .
Solution only for iPhone with 1.1.3 (Official Dev Team Release):
1. Set "Auto-Lock" to "Never"
2. Rename /var/root/Library/Preferences/com.apple.springboard.plist to /var/root/Library/Preferences/com.apple.springboard.plist.old
3. Copy /var/mobile/Library/Preferences/com.apple.springboard.plist to /var/root/Library/Preferences/com.apple.springboard.plist
4. Set "Airplane mode" to ON.
5. run anySIM 1.3 (now it should run smoothly)
6. rename /var/root/Library/Preferences/com.apple.springboard.plist.old to /var/root/Library/Preferences/com.apple.springboard.plist
7. turn "Airplane mode" OFF
