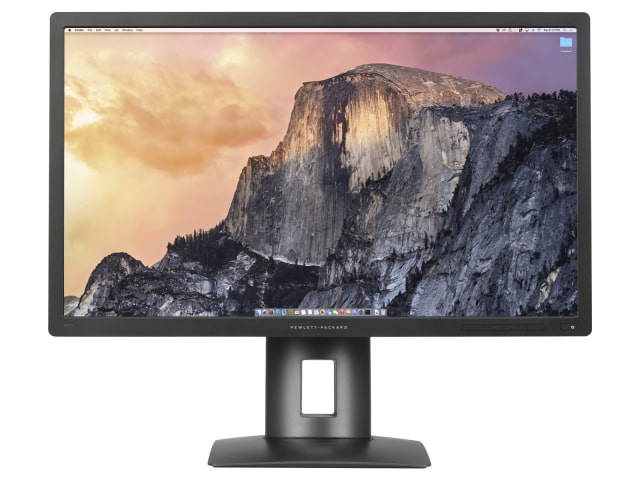
These are instructions on how to enable support for the 5K HP Z27q display in OS X Yosemite 10.10.3 or higher. The Z27q monitor offers 5K resolution at a much lower price than the Dell UP2715k and it claims accurate color calibration for sRGB, Adobe RGB, and BT.709.
These steps detail the instructions on how to get the monitor working with the Late 2013 Mac Pro; however, they should also work for those with the Late 2014 5K 27-inch iMac.


Step One
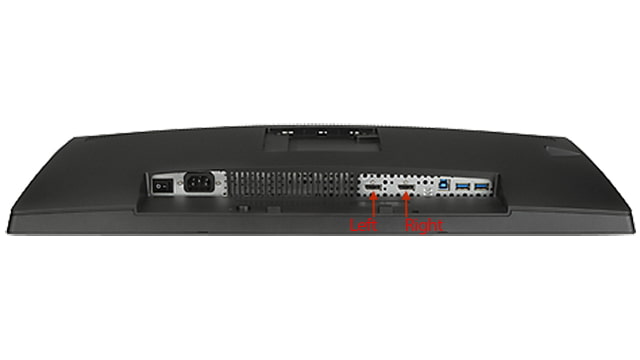
With both devices off, connect the left DisplayPort port on the monitor to the number two(#2) mini-DisplayPort port on the Mac Pro using a male DisportPort to male mini-DisplayPort cable. Note*: You'll need two of these cables and they must support the DisplayPort 1.2 standard.


Step Two
Turn on the power at the back and front of the HP Z27q monitor then power on your Mac Pro.
Step Three
Your computer will boot and the monitor will likely default to a resolution of 4096x2160.
Step Four
Download this zip file to a folder on your computer: DisplayVendorID-22f0-iClarified.zip
Step Five
Double click the archive to extract a folder named DisplayVendorID-22f0.
Step Six
Launch a new Finder window by clicking Command+n.
Step Seven
Press Command+Shift+G or choose Go to Folder... from the Go menu.
Input /System/Library/Displays/Overrides into the entryfield that appears and click Go.
Step Eight
Drag the DisplayVendorID-22f0 folder we extracted earlier into the Overrides folder.
When prompted click the Authenticate button to authenticate adding a folder to this directory.
Input your username and password then click OK.
Notice, the DisplayVendorID-22f0 folder contains a file called DisplayProductID-317b.mtdd which is a plist that overrides the display settings for the HP Z27q.
Step Nine
Reboot your computer by selecting Restart... from the Apple menu at the top left of your screen, then clicking the Restart button.
Step Ten
Once your computer has rebooted and you've logged into your user account, unplug the cable from the number two (#2) mini-DisplayPort port on the Mac Pro.
Connect the right DisplayPort from the HP Z27q monitor to the number one (#1) mini-DisplayPort port on the Mac Pro, then re-connect the left DisplayPort from the monitor to the number two (#2) mini-DisplayPort on the Mac Pro.
After a few seconds your screen will reappear in glorious 5120x2880 HDPI resolution for Retina viewing of a 2560x1440 work area.
Important Notes
* This is not officially supported by Apple.
* We used the specific ports indicated in these steps because they provided the best results during our tests. Technically, you just need to ensure that each DisplayPort cable is connected to a different Thunderbolt bus. We were successful in using other combinations of ports as long as they were on different buses.
* We do not have a Late 2014 5K iMac to test this with; however, Apple has indicated that the iMac does support Dual-Cable Displays. With the right settings in place it should work.
* These steps may also work with other dual-cable 5K displays, if any exist. You would need to modify the Vendor and Product IDs accordingly.
Please follow iClarified on Twitter, Facebook, or RSS for more Apple news, videos, and tutorials.
These steps detail the instructions on how to get the monitor working with the Late 2013 Mac Pro; however, they should also work for those with the Late 2014 5K 27-inch iMac.


Step One
With both devices off, connect the left DisplayPort port on the monitor to the number two(#2) mini-DisplayPort port on the Mac Pro using a male DisportPort to male mini-DisplayPort cable. Note*: You'll need two of these cables and they must support the DisplayPort 1.2 standard.


Step Two
Turn on the power at the back and front of the HP Z27q monitor then power on your Mac Pro.
Step Three
Your computer will boot and the monitor will likely default to a resolution of 4096x2160.
Step Four
Download this zip file to a folder on your computer: DisplayVendorID-22f0-iClarified.zip
Step Five
Double click the archive to extract a folder named DisplayVendorID-22f0.
Step Six
Launch a new Finder window by clicking Command+n.
Step Seven
Press Command+Shift+G or choose Go to Folder... from the Go menu.
Input /System/Library/Displays/Overrides into the entryfield that appears and click Go.
Step Eight
Drag the DisplayVendorID-22f0 folder we extracted earlier into the Overrides folder.
When prompted click the Authenticate button to authenticate adding a folder to this directory.
Input your username and password then click OK.
Notice, the DisplayVendorID-22f0 folder contains a file called DisplayProductID-317b.mtdd which is a plist that overrides the display settings for the HP Z27q.
Step Nine
Reboot your computer by selecting Restart... from the Apple menu at the top left of your screen, then clicking the Restart button.
Step Ten
Once your computer has rebooted and you've logged into your user account, unplug the cable from the number two (#2) mini-DisplayPort port on the Mac Pro.
Connect the right DisplayPort from the HP Z27q monitor to the number one (#1) mini-DisplayPort port on the Mac Pro, then re-connect the left DisplayPort from the monitor to the number two (#2) mini-DisplayPort on the Mac Pro.
After a few seconds your screen will reappear in glorious 5120x2880 HDPI resolution for Retina viewing of a 2560x1440 work area.
Important Notes
* This is not officially supported by Apple.
* We used the specific ports indicated in these steps because they provided the best results during our tests. Technically, you just need to ensure that each DisplayPort cable is connected to a different Thunderbolt bus. We were successful in using other combinations of ports as long as they were on different buses.
* We do not have a Late 2014 5K iMac to test this with; however, Apple has indicated that the iMac does support Dual-Cable Displays. With the right settings in place it should work.
* These steps may also work with other dual-cable 5K displays, if any exist. You would need to modify the Vendor and Product IDs accordingly.
Please follow iClarified on Twitter, Facebook, or RSS for more Apple news, videos, and tutorials.

