These are instructions on how to enable and use Dictation in Mac OS X Mountain Lion.
Step One
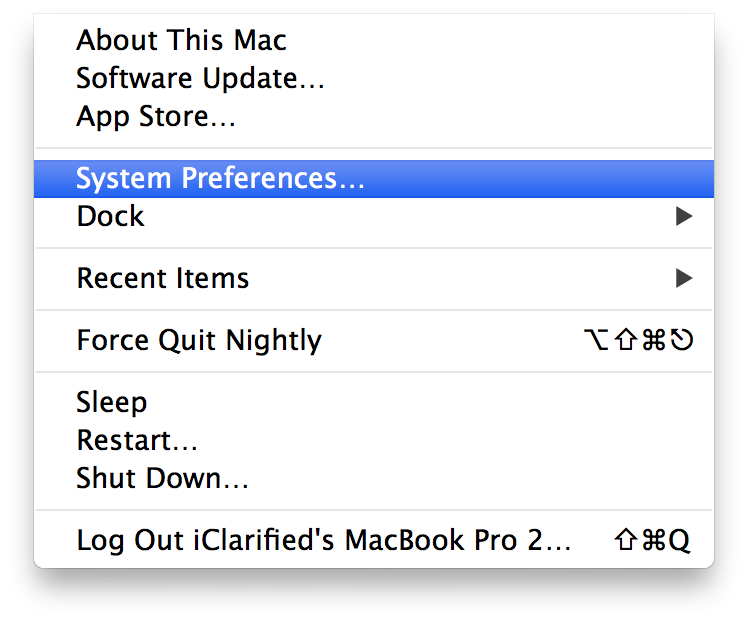
Select System Preferences from the Apple Menu at the top left of your screen.


Step Two
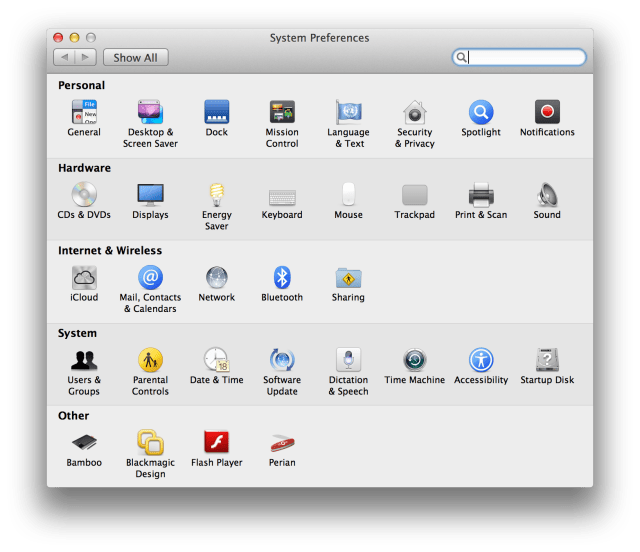
Click to select Dictation & Speech from the System Preferences menu.


Step Three
Click to choose the Dictation tab from the Dictation & Speech menu.
Step Four
Turn on Dictation by selecting the On radio button.
You'll be notified that when you dictate text what you say along with other information such as your contacts is sent to Apple. Click the Enable Dictation button to continue.
Step Five
Choose your audio input device from the dropdown located below the microphone icon. In this example we will use the MacBook Pro's internal microphone.
Step Six
Select a preferred shortcut that will be used to start a dictation from the Shortcut dropdown. In this example we will leave the shortcut as 'Press Fn (Function) Key Twice'.
Step Seven
Select your preferred language for dictation from the Language dropdown. Chinese, English, French, German, Italian, Japanese, Korean, and Spanish are supported.
USING DICTATION:
Navigate to the place where you'd like to dictate text and press the Fn key twice. Notice a microphone icon will appear. As you speak a purple audio level indicator will be displayed inside the icon. No text will appear while you are dictating. You may speak continuously for up to 30 seconds at a time.
When you have finished dictating, click the Done button below the microphone icon or press the Fn key. Your text will be uploaded to Apple for processing.
Once processed the microphone icon will disappear and your dictation will appear as text.
SHORTCUTS:
There are numerous shortcuts available to help improve your dictations. Some basic ones include 'all caps', 'new paragraph', 'new line', 'period', 'comma', 'question mark', 'quote', and 'end-quote'.
A full list of shortcuts can be found below...
Step One
Select System Preferences from the Apple Menu at the top left of your screen.


Step Two
Click to select Dictation & Speech from the System Preferences menu.


Step Three
Click to choose the Dictation tab from the Dictation & Speech menu.
Step Four
Turn on Dictation by selecting the On radio button.
You'll be notified that when you dictate text what you say along with other information such as your contacts is sent to Apple. Click the Enable Dictation button to continue.
Step Five
Choose your audio input device from the dropdown located below the microphone icon. In this example we will use the MacBook Pro's internal microphone.
Step Six
Select a preferred shortcut that will be used to start a dictation from the Shortcut dropdown. In this example we will leave the shortcut as 'Press Fn (Function) Key Twice'.
Step Seven
Select your preferred language for dictation from the Language dropdown. Chinese, English, French, German, Italian, Japanese, Korean, and Spanish are supported.
USING DICTATION:
Navigate to the place where you'd like to dictate text and press the Fn key twice. Notice a microphone icon will appear. As you speak a purple audio level indicator will be displayed inside the icon. No text will appear while you are dictating. You may speak continuously for up to 30 seconds at a time.
When you have finished dictating, click the Done button below the microphone icon or press the Fn key. Your text will be uploaded to Apple for processing.
Once processed the microphone icon will disappear and your dictation will appear as text.
SHORTCUTS:
There are numerous shortcuts available to help improve your dictations. Some basic ones include 'all caps', 'new paragraph', 'new line', 'period', 'comma', 'question mark', 'quote', and 'end-quote'.
A full list of shortcuts can be found below...
| Command | Result |
| question mark | ? |
| inverted question mark | ¿ |
| exclamation point | ! |
| hyphen | - |
| dash | – |
| em dash | — |
| underscore | _ |
| comma | , |
| open parenthesis | ( |
| close parenthesis | ) |
| open square bracket | [ |
| close square bracket | ] |
| open brace | { |
| close brace | } |
| semi colon | ; |
| ellipsis | … |
| quote | “ |
| end-quote | ” |
| back quote | " |
| single quote | ‘ |
| end single quote | ’ |
| double-quote | " |
| apostrophe | ' |
| colon | : |
| slash | / |
| back slash | |
| tilde | ~ |
| ampersand | & |
| percent sign | % |
| copyright sign | © |
| registered sign | ® |
| section sign | § |
| dollar sign | $ |
| cent sign | ¢ |
| degree sign | º |
| caret | ^ |
| at sign | @ |
| Pound sterling sign | £ |
| Yen sign | ¥ |
| Euro sign | € |
| pound sign | # |
| smiley face (or "smiley") | :-) |
| frowny face (or "sad face", "frown") | :-( |
| winky face (or "winky") | ;-) |
| cap (for example, "this is a cap Test") | Capitalize next word |
| all caps (for example, "this is a all caps TEST") | Type in all caps |
| caps on | Caps lock on |
| caps off (for example, "this is caps on A VERY IMPORTANT TEST caps off tomorrow") | Caps lock off |
| no caps(for example, "what time is my meeting in no caps boston today") | All lowercase |
| new line | Insert new text line |
| next line | Go to the next text line |
| new paragraph | Begin new paragraph |
| next paragraph | Go to the next paragraph |
| no space | Do not insert a space after the next word |
| no space on (for example, "the new car is no space on reallyreallyexpensive") | Do not insert any spaces between words |
| no space off | Resume inserting spaces between words |
| space bar (for example, "this restaurant is first space bar class") | Type a space |
| numeral (for example, "he starts from position numeral 5") | Type the numeral, such as 5 instead of "five" |
| Roman numeral (for example, "in January it's Roman numeral MMXIII") | Type the spoken as a Roman number |

