These are instructions on how to sync your iPhone with two or more computers at the same time.
To clarify this process a bit the tutorial is divided into two parts. The first part will instruct you on how to obtain the iTunes Library ID from your main computer. The second part will then modify your secondary computer to use the same iTunes Library ID, thus allowing for sync on both.
For your convenience instructions for Part One and Part Two are provided for both Windows and Mac.
PART ONE (MAC):
If your main computer is a Mac start here...
Step One
Open a new Finder window by clicking the Finder icon in the dock.


Step Two
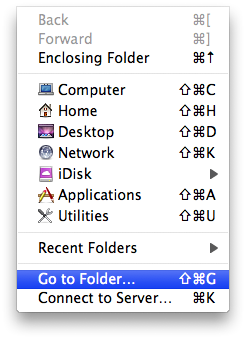
Select Go to Folder... from the Go menu.


Step Three
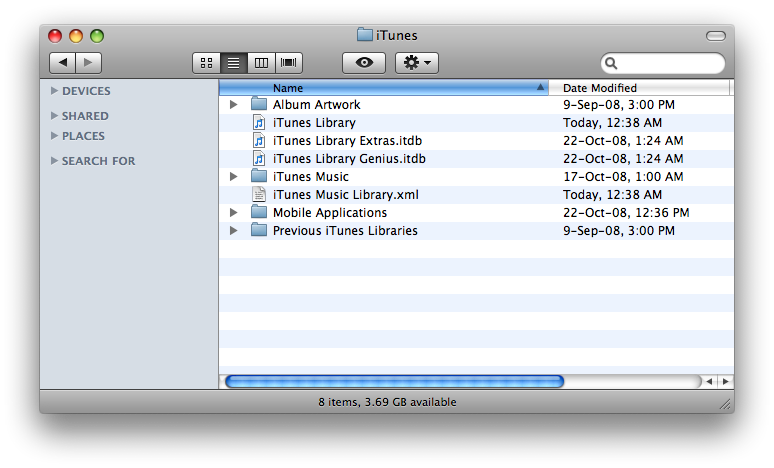
Input ~/Music/iTunes into the textfield then click the Go button.


Step Four
Double click the file named iTunes Music Library.xml to open it in TextEdit.


Step Five
Write down the value of the Library Persistent ID key. Take care not to modify the file before closing. It should look something like D501EB4887717F8F.
PART ONE (WINDOWS):
If your main computer is a Windows PC start here...
Step One
Press the Windows (Start) button at the bottom left of the screen and select Music from the menu.
Step Two
Double click the iTunes folder.
Step Three
Double click the file named iTunes Music Library.xml to open it in Notepad
Step Four
Write down the value of the Library Persistent ID key. Take care not to modify the file before closing. It should look something like 20F830293962CBA4
--------------------------------
PART TWO (MAC):
If your secondary computer is a Mac continue here....
Step One
Open a new Finder window by clicking the Finder icon in the dock.
Step Two
Select Go to Folder... from the Go menu.
Step Three
Input ~/Music/iTunes into the textfield then click the Go button.
Step Four
First we will create a backup of iTunes Music Library.xml and iTunes Library. Select both files and press Command+c then Command+v on your keyboard. This will make a backup copy of the files.
Step Five
Double click to open iTunes Music Library.xml.
Step Six
Make note of the current Library Persistent ID then change the Library Persistent ID key to the one we wrote down from Part One and save the file.
Step Seven
Now we will need to open iTunes Library using a HexEditor. You can download HexEdit from here
Step Eight
Once you have opened iTunes Library use HexEdit to search for the old Library Persistent ID we replaced in Step Five. Do this by clicking Find from the Menubar. Make sure to select Hex as your search type.
Step Eight
Once found replace the old Library Persistent ID with the one from Part One and save the file.
Step Nine
You can now launch iTunes and connect your iPhone to the new computer for syncing. Select your iPhone from the list of devices on the left. Notice if now select Manually manage music and videos from the Summary Tab you will no longer be prompted to erase your data, nor will the files on your iPhone be grayed out.
PART TWO (WINDOWS):
If your secondary computer is a Windows PC continue here....
Step One
Press the Windows (Start) button at the bottom left of the screen and select Music from the menu.
Step Two
Double click the iTunes folder.
Step Three
First we will create a backup of iTunes Music Library.xml and iTunes Library.itl. Select both files and press Control+c then Control+v on your keyboard. This will make a backup copy of the files.
Step Four
Double click to open iTunes Music Library.xml.
Step Five
Make note of the current Library Persistent ID then change the Library Persistent ID key to the one we wrote down from Part One and save the file.
Step Six
Now we will need to open iTunes Library.itl using a HexEditor. You can download HexEdit from here
Step Seven
Once you have opened iTunes Library.itl use HexEdit to search for the old Library Persistent ID we replaced in Step Five. Do this by clicking Find from the Menubar. Make sure to select Hex as your search type.
Step Eight
Once found replace the old Library Persistent ID with the one from Part One and save the file.
Step Nine
You can now launch iTunes and connect your iPhone to the new computer for syncing. Select your iPhone from the list of devices on the left. Notice if now select Manually manage music and videos from the Summary Tab you will no longer be prompted to erase your data, nor will the files on your iPhone be grayed out.
THANKS***: This tutorial is based on the discovery by Andrew Grant. He deserves credit for his work. You can check out his blog posting on the subject here
To clarify this process a bit the tutorial is divided into two parts. The first part will instruct you on how to obtain the iTunes Library ID from your main computer. The second part will then modify your secondary computer to use the same iTunes Library ID, thus allowing for sync on both.
For your convenience instructions for Part One and Part Two are provided for both Windows and Mac.
PART ONE (MAC):
If your main computer is a Mac start here...
Step One
Open a new Finder window by clicking the Finder icon in the dock.


Step Two
Select Go to Folder... from the Go menu.


Step Three
Input ~/Music/iTunes into the textfield then click the Go button.


Step Four
Double click the file named iTunes Music Library.xml to open it in TextEdit.


Step Five
Write down the value of the Library Persistent ID key. Take care not to modify the file before closing. It should look something like D501EB4887717F8F.
PART ONE (WINDOWS):
If your main computer is a Windows PC start here...
Step One
Press the Windows (Start) button at the bottom left of the screen and select Music from the menu.
Step Two
Double click the iTunes folder.
Step Three
Double click the file named iTunes Music Library.xml to open it in Notepad
Step Four
Write down the value of the Library Persistent ID key. Take care not to modify the file before closing. It should look something like 20F830293962CBA4
--------------------------------
PART TWO (MAC):
If your secondary computer is a Mac continue here....
Step One
Open a new Finder window by clicking the Finder icon in the dock.
Step Two
Select Go to Folder... from the Go menu.
Step Three
Input ~/Music/iTunes into the textfield then click the Go button.
Step Four
First we will create a backup of iTunes Music Library.xml and iTunes Library. Select both files and press Command+c then Command+v on your keyboard. This will make a backup copy of the files.
Step Five
Double click to open iTunes Music Library.xml.
Step Six
Make note of the current Library Persistent ID then change the Library Persistent ID key to the one we wrote down from Part One and save the file.
Step Seven
Now we will need to open iTunes Library using a HexEditor. You can download HexEdit from here
Step Eight
Once you have opened iTunes Library use HexEdit to search for the old Library Persistent ID we replaced in Step Five. Do this by clicking Find from the Menubar. Make sure to select Hex as your search type.
Step Eight
Once found replace the old Library Persistent ID with the one from Part One and save the file.
Step Nine
You can now launch iTunes and connect your iPhone to the new computer for syncing. Select your iPhone from the list of devices on the left. Notice if now select Manually manage music and videos from the Summary Tab you will no longer be prompted to erase your data, nor will the files on your iPhone be grayed out.
PART TWO (WINDOWS):
If your secondary computer is a Windows PC continue here....
Step One
Press the Windows (Start) button at the bottom left of the screen and select Music from the menu.
Step Two
Double click the iTunes folder.
Step Three
First we will create a backup of iTunes Music Library.xml and iTunes Library.itl. Select both files and press Control+c then Control+v on your keyboard. This will make a backup copy of the files.
Step Four
Double click to open iTunes Music Library.xml.
Step Five
Make note of the current Library Persistent ID then change the Library Persistent ID key to the one we wrote down from Part One and save the file.
Step Six
Now we will need to open iTunes Library.itl using a HexEditor. You can download HexEdit from here
Step Seven
Once you have opened iTunes Library.itl use HexEdit to search for the old Library Persistent ID we replaced in Step Five. Do this by clicking Find from the Menubar. Make sure to select Hex as your search type.
Step Eight
Once found replace the old Library Persistent ID with the one from Part One and save the file.
Step Nine
You can now launch iTunes and connect your iPhone to the new computer for syncing. Select your iPhone from the list of devices on the left. Notice if now select Manually manage music and videos from the Summary Tab you will no longer be prompted to erase your data, nor will the files on your iPhone be grayed out.
THANKS***: This tutorial is based on the discovery by Andrew Grant. He deserves credit for his work. You can check out his blog posting on the subject here

