These are instructions on how to organize the iPhone applications on your Springboard into folders using Categories.
To follow this tutorial you must be on the iPhone firmware 2.0 or higher. You also need to have a jailbroken iPhone. Instructions can be found to jailbreak your iPhone here: 2G Windows, 3G Windows, 2G Mac, 3G Mac.
Step One
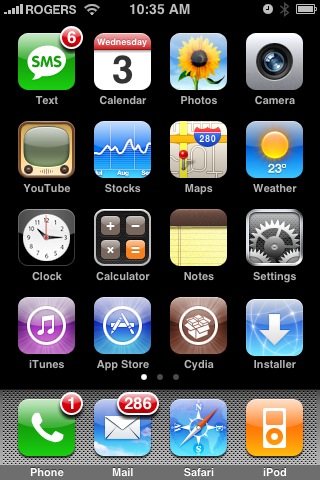
Press to launch Cydia from your Springboard.


Step Two
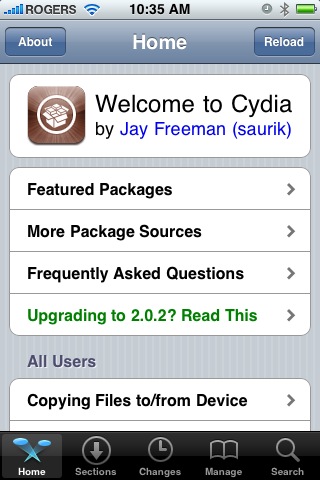
Press to select the Sections tab at the bottom of the screen.


Step Three
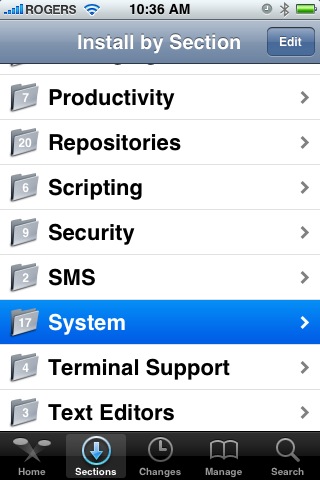
Press to select the System section.


Step Four
Press to select Categories from the list of Packages that appear.
Step Five
Press to select theInstall button at the top right of the screen.
Step Six
Press to select the Confirm button at the top right of the screen.
Step Seven
Once Cydia has installed the Categories application press the Return to Cydia button at the bottom of the screen.
Step Eight
Press the Home button to return to your Springboard. Notice the new Categories application. Press to launch it!
Step Nine
Read the warning that appears then press the large OK button.
Step Ten
You will be taken to blank list of Categories. It is here where we will create folders for our Springboard. Press the Add button at the top right of the screen.
Step Eleven
Enter the name for the Category/Folder you would like to create and press the Add button. I created a folder called Games.
Step Twelve
You will be asked to select an icon for the folder/category you just created.
Step Thirteen
Notice your newly created folder appears in the list now! Press to select it.
Step Fourteen
You now are taken to the Edit menu where you can edit the applications that appear in the Category. Since we have not added any applications to the folder it is blank. Press the Add button at the top right of the screen.
Step Fifteen
You will be shown a list of the applications on your iPhone. Press to select the ones you would like added to the Category then press the Edit button at the top left of the screen.
Step Sixteen
You will be returned to the Edit menu where you can now order and remove applications from the Category. Press the button at the top left to return to the Categories List.
Step Seventeen
Notice it now shows how many applications we have in our folder.
Step Eighteen
Press the Home button. Notice that we now have a new icon for our newly created Category. Also notice that applications we moved into this category are not visible on the Springboard. Press to select the icon for your newly created Category.
Step Nineteen
You will now be shown a list of your applications in the selected Category. Press to launch one!
Step Twenty
If you press the little i at the bottom of the Category you will see some basic options as described by BigBoss.
Folder Title: Displays folder title on main screen.
Save Image On Exit: Saves the current background image when an app is loaded. Leave this on unless there are unusually long delays loading each app.
Icon Labels: You can disable the text labels with this so you see only the icon pictures
Black Background: If you dislike seeing the desktop background from winterboard, you can force a black background with this.
You now can organize your Springboard in a much improved manner!
To follow this tutorial you must be on the iPhone firmware 2.0 or higher. You also need to have a jailbroken iPhone. Instructions can be found to jailbreak your iPhone here: 2G Windows, 3G Windows, 2G Mac, 3G Mac.
Step One
Press to launch Cydia from your Springboard.


Step Two
Press to select the Sections tab at the bottom of the screen.


Step Three
Press to select the System section.


Step Four
Press to select Categories from the list of Packages that appear.
Step Five
Press to select theInstall button at the top right of the screen.
Step Six
Press to select the Confirm button at the top right of the screen.
Step Seven
Once Cydia has installed the Categories application press the Return to Cydia button at the bottom of the screen.
Step Eight
Press the Home button to return to your Springboard. Notice the new Categories application. Press to launch it!
Step Nine
Read the warning that appears then press the large OK button.
Step Ten
You will be taken to blank list of Categories. It is here where we will create folders for our Springboard. Press the Add button at the top right of the screen.
Step Eleven
Enter the name for the Category/Folder you would like to create and press the Add button. I created a folder called Games.
Step Twelve
You will be asked to select an icon for the folder/category you just created.
Step Thirteen
Notice your newly created folder appears in the list now! Press to select it.
Step Fourteen
You now are taken to the Edit menu where you can edit the applications that appear in the Category. Since we have not added any applications to the folder it is blank. Press the Add button at the top right of the screen.
Step Fifteen
You will be shown a list of the applications on your iPhone. Press to select the ones you would like added to the Category then press the Edit button at the top left of the screen.
Step Sixteen
You will be returned to the Edit menu where you can now order and remove applications from the Category. Press the button at the top left to return to the Categories List.
Step Seventeen
Notice it now shows how many applications we have in our folder.
Step Eighteen
Press the Home button. Notice that we now have a new icon for our newly created Category. Also notice that applications we moved into this category are not visible on the Springboard. Press to select the icon for your newly created Category.
Step Nineteen
You will now be shown a list of your applications in the selected Category. Press to launch one!
Step Twenty
If you press the little i at the bottom of the Category you will see some basic options as described by BigBoss.
Folder Title: Displays folder title on main screen.
Save Image On Exit: Saves the current background image when an app is loaded. Leave this on unless there are unusually long delays loading each app.
Icon Labels: You can disable the text labels with this so you see only the icon pictures
Black Background: If you dislike seeing the desktop background from winterboard, you can force a black background with this.
You now can organize your Springboard in a much improved manner!

