These are instructions on how to create and export an iPhoto slideshow. You may want to do this if you are creating a slideshow for a wedding, product demonstration, funeral, birthday, etc.
Step One
Click to launch iPhoto from your dock or your Applications folder.


Step Two
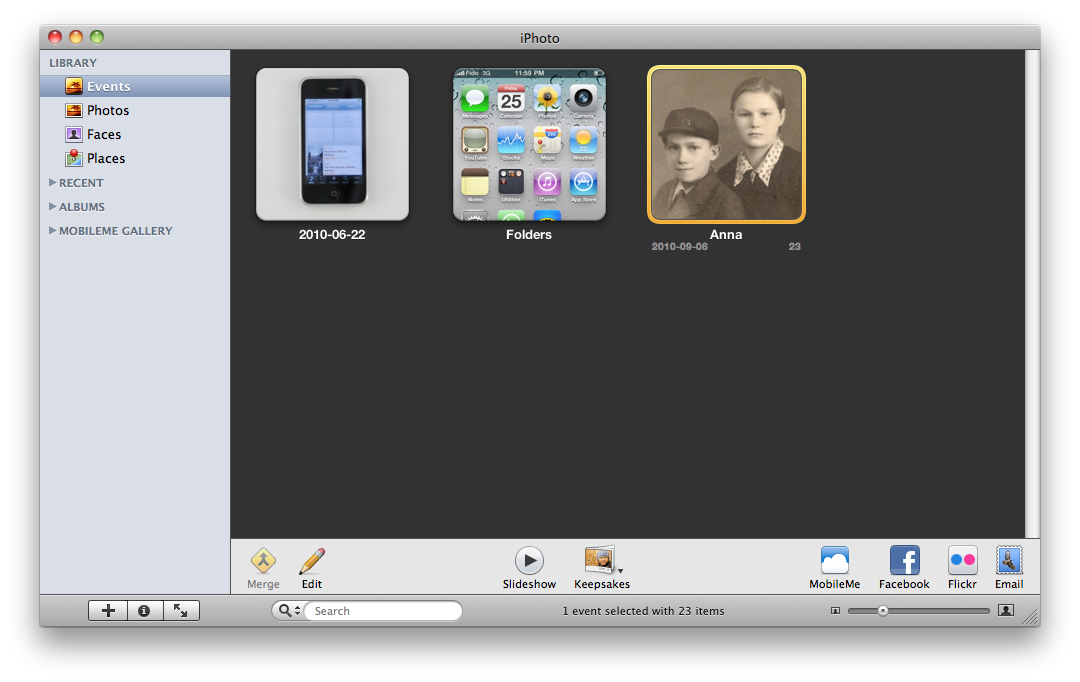
Select the photos you would like to use for the slideshow. If they are all in one event you can simply select the event.


Step Three
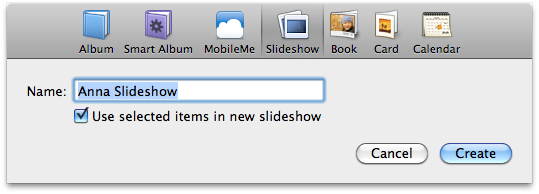
Click the + button at the bottom left of the window then select the Slideshow tab. Name your slideshow and click the Create button to continue.


Step Four
You will notice a timeline of photos along the top of your window. You can use this timeline to drag and drop photos into the order you desire.
Step Five
Click the Themes button at the bottom of the window to select the type of slideshow you prefer. Ken Burns is generally the most popular and produces a nice pan-and-scan effect. Move your mouse over each theme to see a preview of its effect. When you are happy with your selection click the Choose button.
Step Six
Click the Music button at the bottom of the window to select the background music for your slideshow. Make sure Play music during slideshow is selected and choose a source for the music. Apple has included several nice songs under the Theme Music source. You can also select an song that is in your iTunes Library.
If you would like more than one song for the slideshow you can check the Custom Playlist for Slideshow box and then drag and drop longs into a playlist. Once you are happy with the musical selections, click the Apply button.
Step Seven
Click the Settings button to further configure your slideshow. You can use the All Slides tab to set properties for all the photos or set the properties of individual slides using the This Slide tab.
Under the All Slides tab you will notice the option to Play each slide for a minimum of ? seconds. You can adjust this to your liking; however, it may be easier to select Fit slideshow to music. This will adjust your durations to be a perfect fit to the music you selected in Step Six. Other settings include the Transition type and speed, captions, title slide, slideshow repeat, scale photos to fill screen and the Aspect Ratio.
We left Transition alone because the Ken Burns Theme takes care of that for us. We switched the aspect ratio to HDTV for future publishing to DVD.
Step Eight
Close the Settings window and click the Preview button. Watch carefully and make sure you are happy with the show.
Step Nine
If everything looks right, click the Export button. Here you will have a choice of different resolutions for output. We selected Display; however, you can make whichever selection suits your needs. You can also choose to have your slideshow added to iTunes or click Custom Export to fine tune the export settings.
A popup will appear and ask you to select the directory to place the exported slideshow. Navigate to a directory of your choice and click the OK button.
A progress bar will appear and let you know how far along the export is. This will take an extremely long period of time. Be patient.
**Note: You may want to check out our tutorial on how to burn a slideshow or video to DVD without a menu after you are done this tutorial.
Step One
Click to launch iPhoto from your dock or your Applications folder.


Step Two
Select the photos you would like to use for the slideshow. If they are all in one event you can simply select the event.


Step Three
Click the + button at the bottom left of the window then select the Slideshow tab. Name your slideshow and click the Create button to continue.


Step Four
You will notice a timeline of photos along the top of your window. You can use this timeline to drag and drop photos into the order you desire.
Step Five
Click the Themes button at the bottom of the window to select the type of slideshow you prefer. Ken Burns is generally the most popular and produces a nice pan-and-scan effect. Move your mouse over each theme to see a preview of its effect. When you are happy with your selection click the Choose button.
Step Six
Click the Music button at the bottom of the window to select the background music for your slideshow. Make sure Play music during slideshow is selected and choose a source for the music. Apple has included several nice songs under the Theme Music source. You can also select an song that is in your iTunes Library.
If you would like more than one song for the slideshow you can check the Custom Playlist for Slideshow box and then drag and drop longs into a playlist. Once you are happy with the musical selections, click the Apply button.
Step Seven
Click the Settings button to further configure your slideshow. You can use the All Slides tab to set properties for all the photos or set the properties of individual slides using the This Slide tab.
Under the All Slides tab you will notice the option to Play each slide for a minimum of ? seconds. You can adjust this to your liking; however, it may be easier to select Fit slideshow to music. This will adjust your durations to be a perfect fit to the music you selected in Step Six. Other settings include the Transition type and speed, captions, title slide, slideshow repeat, scale photos to fill screen and the Aspect Ratio.
We left Transition alone because the Ken Burns Theme takes care of that for us. We switched the aspect ratio to HDTV for future publishing to DVD.
Step Eight
Close the Settings window and click the Preview button. Watch carefully and make sure you are happy with the show.
Step Nine
If everything looks right, click the Export button. Here you will have a choice of different resolutions for output. We selected Display; however, you can make whichever selection suits your needs. You can also choose to have your slideshow added to iTunes or click Custom Export to fine tune the export settings.
A popup will appear and ask you to select the directory to place the exported slideshow. Navigate to a directory of your choice and click the OK button.
A progress bar will appear and let you know how far along the export is. This will take an extremely long period of time. Be patient.
**Note: You may want to check out our tutorial on how to burn a slideshow or video to DVD without a menu after you are done this tutorial.

